Digital Photography

Understanding Dynamic Range Of Colors

In real world, there is nothing called real white or real dark. It is only representation of degree of light source intensity and subject's reflectivity. If somebody says something is white, that means light intensity on that subject is maximum and that of black is minimum. But there is no real measurement which is absolute white and which is absolute dark and same thing applies to photography. I think that is the reason there is a term called "dynamic range of colors" and we are going to discuss about it today. When we talk about dynamic range, we are talking about range of brightness. For example dynamic range of our eyes refers to the range of brightness in which we can see. When you go to the room that is so dark you can't see anything, then you are outside of the dynamic range of your eyes. Similarly if you are driving to the direction of the sun, you might have trouble seeing road properly and you are sort of blinded by powerful lights of sun. And that means you are again outside of dynamic range of your eyes; you are experiencing more light than your eyes can handle. Obviously more dynamic range you can perceive, more places you can see. Dynamic range also impacts your perception of color because colors have brightness. So when you can see better range of brightness, you can probably see greater range of colors.

In terms of photography, dynamic range gives the ratio between white and dark subject and describes the ration between maximum and minimum intensity of light (contrast ratio). As you all know that light is measured at each pixel level (a digital camera uses a sensor array of millions or tiny pixels to produce the image) and each of those pixel contains "photosite" which collects and stores photons when exposure begins by pressing shutter release button.  When the exposure is finished, the quantity of photons in each photosite gives various intensity levels of light which is determined by bit depth (0-dark and 255-white for an 8-bit image). If each photosite contains 1024 photons, then the contrast ratio would be 1024:1. Generally speaking, dynamic range of colors is higher for DSLR cameras than the compact point and shoot cameras even if their pixel is same because of the bigger sensor size in DSLR cameras (bigger sensor size means bigger photosites and hence more lights can be captured). Usually in digital cameras, the most common method of representing a dynamic range is f-stop which is power of 2. A contrast ratio or 1024:1 would there be represented as having dynamic range of 10 f-stops.

You should already be familiar with photographic concept, stop of light or f-stop. Every time the light in the scene doubles, we say that light has been increased by one stop. Similarly if the light scene is halved, we say it is decreased by one stop. In photography, f-stops are measure of the lights. If you measure the dynamic range of your eyes that is the range from darkest light to brightest light that you can perceive, you find that your eyes have around 18-24 stops worth of dynamic range. And today's most advanced DSLR camera might have 10-14 stops of dynamic range.

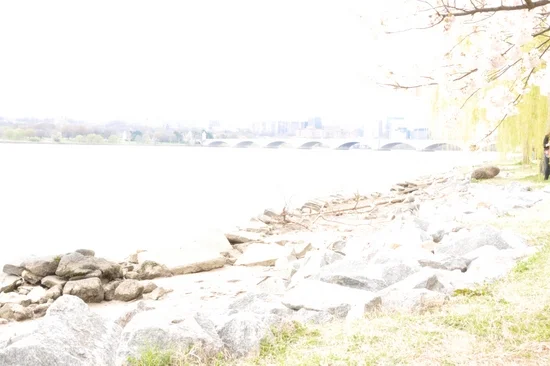
Basically, anytime when there is a big difference between the brightest object and the darkest object in your scene, you have probably gone beyond dynamic range of your camera. If we consider each photosite as a bucket, we can assume photons as a water drops. If the bucket is full, photons will overflow and a photosite having overflown photons means it is saturated for lights and hence defining the camera's white level and no more colors can be represented within that photosite. Below is the picture where I tried to illustrate the point where photosite is overflown by too many photons and hence loosing details of the image.

Dynamic range of colors - bright scene

Dynamic range of colors - bright scene

Similarly, if photosite couldn't capture enough photons, it will loose the contrast in the picture and hence producing only dark side of the image.

Dynamic range of colors - dark scene

Dynamic range of colors - dark scene

With the digital cameras, it's almost impossible to get all the colors in single image specially when there is too much variation of light. That is why the concept of HDR photography is becoming popular in which we combine multiple pictures using different HDR algorithms to create a single HDR image which should give us maximum dynamic range of colors.

Dynamic range of colors - HDR image

Dynamic range of colors - HDR image

In creating a image by using HDR technique, we take multiple shots from the very dark image to the very white image using the Bracketing technique where we get multiple levels of contrast and by combing them into a single picture, we get the maximum possible range of colors.

What Is Meant By 18% Gray And How Is That Number Arrived And Why?

This post is written by Guest Contributor, Alex B. Wright. If you are also interested in writing a guest blog, please reach out using the form in the Contact page.

We know that there are two types of exposure meters for measuring light that the camera uses. One is reflected and the other is incident. What does this mean and how do you use both? The type that is in most cameras is a reflected kind. Incident is the meter that has a dome on it and this dome is pointed to where the camera is. The reflected meter is pointed at the subject to get proper exposure. Some meters also measure flash but that is another topic. You might ask why 18% gray? Where did they get that number? Well here is the math behind your question. If we use the number 3 for our starting point at the blackest image you can have. Double that number we get 6 and double it again we get 12, double it again we get 24, double it again we get 48, double it again we get 96 and this is the lightest that can be recorded. This as you may have already guessed is tied into f/stops; each time you go to a larger lens opening, you double the amount of light that hits the light receptor that records the image. Now write this number down. Between 12 and 24 you get the number of 18 and that makes it in the middle of the exposure. That is half way between the darkest black and the lightest white. That is why exposure meters are programmed to 18% gray.

Now let’s talk about the exposure meter in your camera, a Reflected Meter, regardless of camera model you have. It measures the light coming into the receptor, mixes it all up and gives you an 18% gray which is the half way from Black to White. The meter measures the light reflected back from the subject in front of the camera.

The second type of meter is the Incident Meter which is not built into the camera. It is a separate meter that has a dome. This dome is at the subject location and is aimed at where the camera is to be located. As an aside, this is the type that is used in most studios. With this type of meter you can get the ratio of the light that falls on the subject when you are in a studio set-up. This is not an explanation of lighting ratios and how to get them. Lighting and ratios is another topic for a later day. But you can use your camera even though it is a REFLECTED light meter and can be changed it into an INCIDENT light meter later. This is not that hard to do as it sounds. There is a simple way to accomplish this which we will discuss in next paragraph.

Only the secrete thing you need is a clean white Styrofoam coffee cup and then place the coffee cup over your lens. It is best to use a 50 mm lens. Now, aim the camera from the subject’s location towards where the photographer will be and get that exposure reading noted down. Manually set the camera to this exposure reading, remove the coffee cup, go to the camera location and take the photograph. This is what the dome on the incident meter is for and how it is used. Just try this out and your exposures will be more accurate.  Use the meta data information about the image you have just taken.

Few Things To Consider When Taking Animal Shots

When I bought my first DSLR three years ago, I had no clue about the composition, photography technique, lighting and many other things. I just bought a DSLR camera because I had interest in photography and enjoyed taking pictures. I still remember a shot of a deer that I took from the back and was very happy with the result. It had shallow depth of field, well focused and good light. I couldn't find anything wrong with my picture and thought to share with my photography community. Guess what? My composition was completely wrong which I realized after fellow photographers commented about it. And you probably have already guessed what went wrong on my picture. Yes, I took the shot from the back of an animal and viewers couldn't connect to that photograph very well. I started learning from my mistakes and today, I thought I would write something about what I learned so far so that you don't have to go through same mistakes and waste your time. But instead, you can use that time for taking creative shots.

When shooting animals, there are few important camera settings and the composition ideas which you may want to follow to get better results and connect well to the viewers. Let me explain them briefly in points.

1. When shooting birds or animals, you may want to use the spot metering so that the camera meters exposure based on the focus point.

2. Use Continuous-servo (AF-C) Autofocus mode with the single point AF or the Dynamic Area AF Autofocus point. When you in AF-C mode, after you press the shutter release button, camera focuses your subject wherever you select the focus point and continues to monitor the subject to refocus if the subject moves along and the single point focusing method helps you to focus on particular area, an eye for example. Using the Dynamic Area AF helps you to track the moving subject if it goes out of focus in the frame. If you are shooting flying birds or fast moving animals, you may want to use the Dynamic AF points.

3. Use the widest aperture (smallest f number) possible so that you will get the faster shutter speed to freeze the motion of moving subjects.

4. While shooting animals, try to focus on eye as much as possible because it naturally draws the viewer’s attention to the photograph immediately.

Here are few photographs I took recently and hope you will like it.

UME_0078.jpg

This shot was taken at the National Zoo, Washington DC and I liked how this cat is cautiously look at me while drinking water.

DSC_0678.jpg

Learning from the mistake is the best way to learn. You will never forget what you learned and sharing those ideas with others help you grow even bigger and faster.