Flash Photography

Learn About Nikon Creative Lighting System

Flash photography is a different world of creativity which requires a new experiment everyday. Adjusting a light, setting up the color temperature and creating the effects for your subject are some of the important aspects of flash photography. Most of the camera comes with a built-in flash unit and even if they don't, you can use the compatible external flash units to meet your needs for the extra light. You can use the built-in flash or the external flash unit if the natural light source (day light) is not working for you or if you do not have any external light source at all (dark situation). When you work everyday with the flash, you might want to do an experiment with the lights in different scenarios. Sometimes you want to use the direct flash to your subject, sometimes you want to use the bouncing flash or even kicker flash to give an extra ordinary effect to the subject. If you are just learning about the flash photography or do not have enough experience in flash photography, you might not get the exact result you want. As you learn more and gain more experience, you feel more comfortable with the settings which brings more confidence to you.

Guide-on-Nikon-CLS.jpg

If you are interested about the flash photography, you might be looking for some guides or helpful resources on how and where to start from. Don't worry, I have a good news for you. Nikon School has produced a DVD called Nikon School presents A Hands-on Guide to Creative Lighting featuring two prominent photographers, Joe McNally and Bob Krist. The DVD is professionally done and very well designed to give the most out of it to the viewers.

Total DVD is two and half hours long. The DVD begins with a detailed overview of basic lighting technique by Bob Krist. He explains everything about the technical aspects of Nikon flashes like CLS, i-TTL, Master flash unit, Remote flash units and working with the group flash units. He also demonstrates the light effect to the portrait photography by actually doing it inside his studio which I found very informative. You will get a chance to learn many things about the lighting by watching that part. Bob then introduces Nikon flash gears SB-600, SB- 800, SB-900, SU-800 as well as other flash kits.

In the second part, for about one and half hours, Bob Krist meets with Joe McNally at the ballet dance school in Boston where they shoot with the students and demonstrate how does the flash work in real life situation. Later, they go to few other locations and do the rest of the shootings. Joe McNally does the shooting part and Bob Krist is there assisting him. Bob asks lots of questions to Joe from the viewers perspective which is very helpful to understand the process of working with the flash in various lighting situations.

If you watch the DVD and practice as they suggest, you will be mastering Nikon Creative Lighting System very soon. I can't get enough of watching this DVD and learning new tips and tricks every time I watch the DVD.

Nikon Wireless Speedlight Commander Unit, SU-800

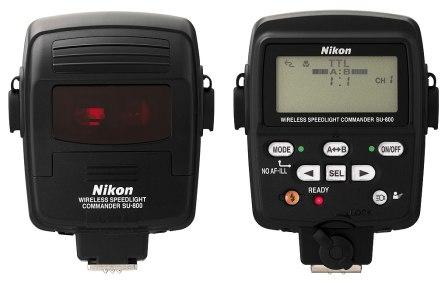
SU-800 is a Nikon speedlight commander unit to control other Nikon wireless remote units. It is a very powerful device, easy to use and supports up to 4 Channels and 3 Groups. There is a little switch inside the battery chamber that allows you to switch between the close-up mode and the commander mode. Close-up mode is used for controlling the SB-R200's units and the commander mode is use to control one or more of the Nikon SB-600, SB-800 or SB-900 units wirelessly. Previously, we discussed about how to configure the SB-600, SB-800 and SB-900 units as wireless remote units. In this blog, we will briefly discuss on how to set the SU-800 to control these remote wireless units.

SU-800 Unit

SU-800 Unit

When you turn the SU-800 unit on, it will give you the information about the available Channel groups, their settings (TTL mode and the exposure for example) and the Channel number associated with that group. When you change any of the settings, those settings will be applied to the remote units which are under the same group and the channel as this master unit is. You can use the SEL button to change the values for the Group and the Channel number. Left and right arrow of the SEL button can be used to increase or decrease the exposure compensation value (EV) or the Channel number depending up on which settings you are in. The MODE button will allow you to program the mode of the remote flash unit. Flash can be programmed in TTL (Through The Lens) mode, AA (Auto Aperture) mode, M (Manual) mode and - - (don't trigger the flash) mode. If you want to reset all the setting at once, press the MODE and the ON/OFF together for a while and it will reset the unit to factory default settings.

The Nikon SU-800 unit can only be used as a master unit unlike other speedlight units, SB-800 or SB-900 for example. Nikon SB-800 and the SB-900 can act as a both master flash unit and the remote flash unit which I already discussed in my previous blogs. The SU-800 can control the multiple flash units in four different channels and three different groups and the combination of the SU-800 and the SB-R200 units are popular for a closeup photography or also called macro photography.

How To Setup Nikon SB-900 As a "Wireless Remote Unit"

Last time we discussed about Setting up the SB-900 as a Master Flash Unit and Setting up the SB-800 as a Wireless Remote Unit. Now, we will see how to configure a SB-900 speedlight unit as a wireless remote unit or also called a slave unit. Compared to the Nikon SB-800 and SB-600, it’s fairly easy to setup SB-900 into the slave mode. We can set the SB-900 for a remote operation by using the power ON-OFF switch or also called the wireless setting switch.

Here are the steps to follow,

SB-900-Remote-Setup-1.jpg

1. Turn the switch while holding down the button at the center.

2. Align the index on the power ON-OFF switch to REMOTE.

This is all you need to do to configure a SB-900 as a remote unit. The next step would be setting up a group and the channel number on the remote flash units.

Setting up the remote unit was pretty easy and straight forward. Now let’s setup the proper group and channel number as you have set in the camera or the Master Flash Unit or SU-800 unit whichever is controlling this remote unit.

1. Press the Function button 1, then turn the selector dial to choose a desired group name, and press the OK button.

Note : Left button to the lock sign is the function button 1 and the right one is the function button 2.

SB-900-Remote-Setup-2.jpg

Group name and the channel number being set appears to be larger than the others. For the remote flash units where the flash mode and the flash output level compensation values are to be set identically, place these flash units into the same group.

2. Press the Function button 2, then turn the selector dial to choose a desired channel number, and press the OK button.

Be sure to choose the same channel number as set on the Master flash unit or in the Commander mode on the camera otherwise they do not communicate with each other. Setting up the SB-900 is much more easier and straight forward than the SB-800 or the SB-600.

Source: A Hands-on Guide to Creative Lighting by Nikon School