Let's Review Nikon's Latest DX-Format DSLR, D7500

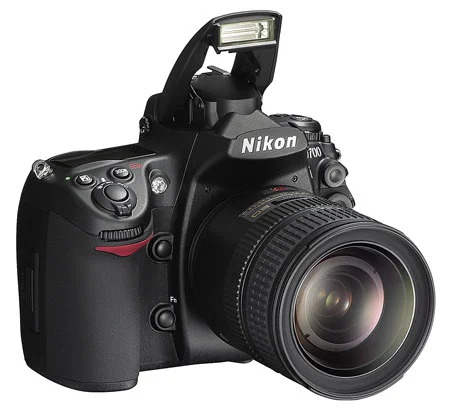
Nikon released a new DX-Format DSLR camera for serious enthusiasts earlier this year (announced on April 12, 2017 to be exact). It is the latest model release in DX-Format series and comes with the 20.6 Mega Pixels on the image sensor. After releasing major updates on DX-Lineup back in 2013 with D7100, Nikon didn't offer much revolutionary features in D7200. But Nikon's latest release came with some exciting features that sits between last year released Nikon's flagship DX-Format digital SLR camera, D500, and an earlier model D7200. It carries some of the best features from D500, specially imaging quality, and the body type of D7200 making it the best DX-Format for someone who is trying to upgrade from D7200 but do not want to commit for the more expensive D500 yet. Nikon released D7500 (body only) with the price tag of $1,250 and if you want to get it with 18-140mm kit lens, it costs you around $1,750. Since it is the mix of D500 and D7200, it has the best of both bodies with some added new features. Now, let's review some of the features available on new Nikon D7500 and what are the upgrades from it's predecessor, D7200, and compromises from the flagship DSLR, D500.

Nikon D7500

Nikon D7500

Improved Sensor and Processor - D7500 uses the same imaging sensor and high-performance Nikon EXPEED 5 imaging processor that is used in D500 which is 30% faster than the EXPEED 4 processor used in the D7200. It gives D7500 a huge advantage over D7200 for many key areas like buffer speed, image quality, video capability and better ISO performance. The price is a steal if you are looking for an upgrade from other lower end DX-Format DSLR.

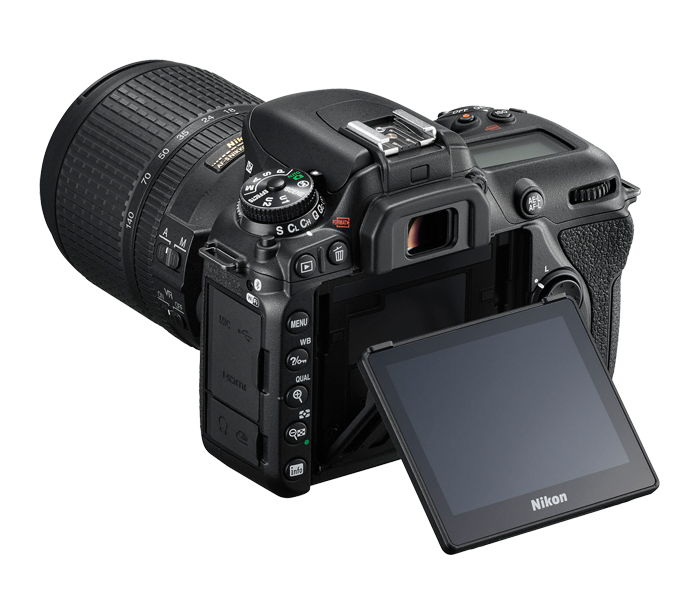
New Body Design - The 'carbon-fiber reinforced' body has been redesigned to make it lighter (1.6 oz. or 45g lighter than the D7200) and little smaller. Nikon introduced D7500 with the tilting screen and the touchscreen feature. Nikon D7200 had a fixed screen but D500 came with the tilting screen. However, D7500 has a fewer pixel (resolution) on the LCD screen than D7200. The D7500 has the same control layout as the D7200, with a mode dial on the top. D500 had more professional bodies style mode dial, however. Another feature that D7200 had and D7500 lacks is a dual card slot. It might be a deal breaker for some photographers, wedding photographer specially, because shooting with only one memory card is a risky job.

Nikon-D7500_Tilted_Screen.png

Performance (Frame per second and Buffer Size) - The D7500 increases the shooting speed to 8 frames-per-second continuous (up from 6 FPS in D7200). This is an excellent feature to have for sports or wildlife photographer. D7500 also comes with a buffer capacity of up-to 100 JPEG images and 50 RAW (NEF) images using high quality images and 14-bit setting with lossless compression. Buffer is a space in a camera body where it stores images before writing it to the memory card. That is why it is a very important feature to measure the shooting performance. To compare, D7200 had 18 RAW and D500 had 200-RAW buffer capacity. Also, D7500 comes with 150,000-shot shutter life.

Additional Metering Mode - In addition to already existing three metering modes (Matrix, Center-Weighted and Spot), Nikon has added a new Highlight-weighted metering mode with the adoption of 180,000-pixel RGB sensor (also used by D500) to increase the accuracy of automatically controlled functions, including AF and AE, Auto White Balance and Active D-Lighting.

Advanced Creative Lighting System - Since Nikon introduced the new technology to handle the communication between creative lighting systems, D7500 is the first DSLR which comes with the pop-up flash that talks to other external flash units using a radio signal. This is a huge upgrade from the old infrared system, which only worked within limited range and required direct line of sight between the camera and the external flash unit.

Captures 4K Video - Nikon D7500 comes with same 4K UHD/30p video recording feature found in D500. If you shoot 4K UHD, it can record up-to approximate 30 minutes. And the movie recorded with this camera is supported by smart devices so that you can view on them quickly without doing any cross platform conversion. You can also create a time lapse video within the camera and output it to an external device using an HDMI port while it is being recorded in camera memory. It also comes with an electronic vibration reduction, which helps to reduce the effect of camera shake while recording hand-held.

Let's see briefly what are the good sides and not so good sides of this DSLR camera.

Pros

1. D7500 comes with a built-in focus motor, so it works with all AF lenses (for an Autofocus purpose).

2. Weather-sealed body - Even though it is not constructed using magnesium-alloy like other more expensive pro bodies, according to Nikon, it protects against light rain even though it is not completely waterproof.

3. Deeper grip - D7500 body comes with a deeper grip and makes it easy to curl your fingers fully around the grip and feel camera body secure and comfortable in your hand.

4. D7500 comes with the support of Nikon SnapBridge system which allows you to transfer the images from the camera to the smart devices using Bluetooth and Wi-Fi connections.

5. Nikon D7500 comes with a new Autofocus mode called Group-area AF which uses a group of five Autofocus points in a 'diamond' shape and focuses object which is nearest to the camera within that area. This mode is a new addition to already existing 3D-tracking mode and helps to focus randomly moving subjects.

6. D7500 also comes with an impressive maximum ISO of 51,200 compared to 25,600 in D7200. It is set to perform very well in low light conditions.

Cons

1. It comes with a single card slot and may be a deal-breaker for some photographers.

2. It comes with slightly fewer pixels in the both sensor pixel (20.6 MP Vs. 24 MP on D7200) and the LCD monitor than it's predecessor, D7200, but might not be an issue to many.

3. Nikon D7500 doesn't have a built-in GPS and need to buy an extra GP-1A GPS unit if you want to track the location of your images.

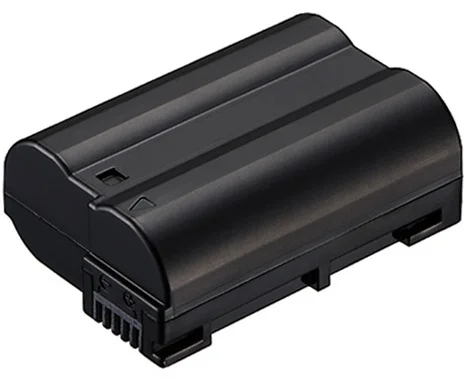
4. It is powered with an EN-EL 15a rechargeable Li-ion battery which is different from older EN-EL 15 batteries used in D7200 and D500. According to Nikon, the battery can take up-to 950 shots which is slightly lower than on D7200 (takes up-to 1,100 shots) and D500 (takes up-to 1,240 shots) when fully charged.

5. And on top of lower shot counts per battery, it doesn't have an option to install an additional external battery grip like in other professional DSLR models.

In my view, if you are looking for an upgrade to your older model DSLR, Nikon D7500 might be a perfect choice for you given all the new technologies Nikon has put together into a smaller, lighter and comparatively inexpensive body.

Moving From Capture NX2 To Adobe Lightroom

If you are following my blog since it's early days, you probably know that I started my photography journey as a hobby with a Nikon D60 back in 2010. My choice of Nikon camera as a first DSLR was purely accidental. I was shopping for DSLR camera in my local Best Buy store where I came across Nikon brand, and having minimal knowledge about other DSLR brands during the purchase, I came home with the Nikon D60. Since then, I am shooting with Nikon camera. It took me few months to get familiar with different camera settings but after knowing how it works, I found it very easy to use and never thought of switching to another brand, not because I hated other brands but simply I started loving Nikon cameras, it's controls and settings and the wide varieties of lenses it offers. After playing with the D60 for a year, I upgraded to D90 and then after couple of years, I bought my first full frame DSLR, D700 (one of the best camera I ever owned), which I am still shooting with happily. But I think it's time to upgrade my D700 (to get more dynamic range and higher pixel in the image sensor) to either D750 or D810 which I haven't decided yet but I am leaning towards the D810 for few reasons which I will share with you once I pull the trigger. Initially, during my learning phase, I used to shoot only in a JPEG format but later when I discovered the advantage of shooting in a RAW format and post processing techniques, I started looking for good post processing software. After doing some research on the software and since I was already shooting with Nikon camera, I went with Nikon's image editing software, Capture NX2. It was a good choice and working great and most importantly, I was very happy with it until Nikon pulled the plug and announced that they are not going to update the software anymore and released their newer editing software, Capture NX-D, instead. I never tried using Capture NX-D (I was kind of mad with the Nikon) and still use Capture NX2 to edit my pictures. But since I am thinking to upgrade my camera, Capture NX2 wouldn't be able to process the RAW images from new DSLRs since it doesn't recognize the image format (thanks to Nikon). I had no choice but look for alternatives and thought of giving a try to Adobe Lightroom which is probably the most popular image editing software in the current market.

I downloaded a 7 days free trial version of an Adobe Lightroom and started playing with it. Among many other features, I loved how it handles the creation of an HDR (High Dynamic Range) image. Capture NX2 couldn't create an HDR image out of multiple exposure shots by itself. If I wanted to create an HDR image, either I had to use an HDR Efex pro from Google Nik Collection and then export the TIFF file and import it back to Capture NX2 for further processing or use other third party HDR processing tools. Since I would like to keep things simple and make life easier, I was looking for one stop solution to edit RAW images and create an HDR image out of multiple bracketed shots as well if I ever wanted to. When I discovered that the latest Adobe Lightroom does both effectively, first thing I wanted to try was to create an HDR image with it. The process was very easy; import all the multi exposure files into the lightroom and then right click those files to merge them into an HDR (it also had an option to merge into Panorama if you want to create a panoramic image using multiple shots). And to be honest, I got really impressed with all the tools it provides for color controls, image sharpening, dealing with noises, lens error corrections and various other touch up tools.

Here is a single shot of Boston downtown (non HDR version) which I took few years ago and processed using Capture NX2. If you want to see the camera settings I used for this shot, please read my earlier blog post about Setup I used for Night Cityscape Shots 

Boston Downtown (click the image to view full size)

And here is an HDR version of same shot created in a Lightroom by combining five exposure shots (-2 EV, -1 EV, 0 EV, +1 EV and +2 EV). After creating an HDR image, I also added some color tones to highlight some of the image area, sky for example. You can see more range of colors and visible clouds in an HDR version whereas those details were lost in a single exposure shot (above).

Boston Downtown HDR (click the image to view full size)

The beauty of the Lightroom is that while creating an HDR image, it creates a DNG (Digital Negative) file which is also non-destructive RAW file and you can edit it further if you want to adjust more color tones or any other settings you like.

I am not writing this blog to favor one software over another but after using Capture NX2 for little over five years, I think Adobe Lightroom came out as the best alternative for me. If you are already using Lightroom or any other image editing software, please share your experience in the comment section below.

Happy Shooting!

Do Not Use Cropping As An Excuse

Cropping is an editing skill that has always been an important part of photography. It was widely used during the days of black-and-white photography and is now considered as an integral part of digital photography. Even though your frame is well composed during shooting, sometimes technical adjustments demands cropping. In digital photography, cropping gives you the power of reworking on your composition well after it has been shot. Modern editing tools come with cropping option loaded with presets of different composition techniques, rule of third for example. It gives you an option for deferring design decisions, and even let you explore new ways of organizing the photograph.

When you do stitching, you are combining more than one shot to make a larger image but during cropping, you are actually reducing the size of the image. This is very important point to remember if you are planning to crop your image later during post processing because cropping demands your original picture to be in high resolution if you do not want to loose the details in larger printing.

It is very common for the wildlife photographer to shoot very high resolution picture and later crop it to highlight the important part of the shot, eagle catching a fish or the head-shot of the bald eagle for example. Cropping is also being widely used to magnify the moon shot and most of the time it has nothing to do with the composition.

With the use of computer and advanced software, cropping process is becoming very easier and clearer. However, it is very important not to think of cropping as an excuse for not composing well at the time of shooting. You shouldn't let the cropping tool to become a habit of not being decisive about the composition during the shooting. The danger of creating such habit is that you start thinking that you can perform a significant proportion of photography on the computer and it introduces an interruption in the process of making a photograph.