Q & A

How To Use AE-L/AF-L Button Correctly?

This post is a part of our Q&A section. If you want to submit your question, please use the form in the Contact page.

QA.jpg

Darren (London, UK) asked : What is the function of AE-L/AF-L button which is on the right side of the viewfinder on my Nikon D60. I read the camera manual but couldn’t grasp the concept of it. Can you write about its feature or may be how to use it and when to use it?

I wrote a blog on how to set AE-L/AF-L button on Nikon D90 and how does it work a while ago. Nikon’s all DSLRs including D60 share same theory about how it works but it depends on the situation when do you want to use it. Basically AE-L/AF-L stands for Auto Exposure Lock/Auto Focus Lock but you can use AE-L/AF-L button for many other different functions. You can even use this button to lock Flash value which we discussed in a earlier blog. Camera menu option and the button position on the camera may vary depending on the camera model, but you will find it under the CSM menu and probably you have to go under the Control option. If you want to see the details on how to set AE-L/AF-L button in your camera, you may want to check the blog post on How to set AE-L/AF-L button on Nikon D90. In this article, I am going to demonstrate the effect of Auto Exposure Lock feature with the help of couple photographs I took. Once you grasp the concept of it, you can apply the technique in similar situations.

Before applying Auto Exposure Lock (AE-L)

Before applying Auto Exposure Lock (AE-L)

My camera was in Aperture Priority mode and the metering system was in Matrix metering mode. That means camera metered the exposure based on the overall scene inside the frame. The white snow background gave the sense of a bright situation to the camera metering system and it calculated the Shutter speed accordingly. But when I took the picture, the main subject came out underexposed because the camera metering system couldn’t figured it out that the main subject was not as bright as majority of the frame.

After applying Auto Exposure Lock (AE-L)

After applying Auto Exposure Lock (AE-L)

To overcome this issue, I thought Auto Exposure Lock (AE-L) feature would be the best choice in this situation. Before activating the feature, I zoomed in little bit so that the brighter area in the frame will get reduced and the camera metering system won’t be fooled. After that I focused on the main subject and press the AE-L/AF-L button to lock the exposure at the current values. At this point, the camera metering system calculated the exposure values based on the relatively darker area because I eliminated the most of the snow by zooming into the subject. I then zoomed out (recomposed the shot) and took a picture with the locked exposure. This gave me a nicely lit subject and well exposed background. If you are not careful enough with the framing, you might end up getting some overexposed areas in the frame as well.

[Updated on 4/30/2019] Someone might argue that why don't we use spot metering instead of matrix metering and lock the focus on the subject’s face and meter the exposure. By doing so, camera is going to meter the light based on the spot where the focus is locked on and not the entire frame, which will then properly exposed the subject. Yes, it might work in some cases but not a good choice in every situation, and that is the exact reason I chose this picture to demonstrate the effect. If I use spot metering in this particular scenario, it will properly expose the subject but will also overexpose the snow area way too much than I would like it be.

How To Take Multiple Shots In A Self-Timer Mode?

This post is a part of our Q&A section. If you want to submit your question, please use the form in the Contact page.

QA.jpg

Shyam (Delhi, India) asked : I have set my camera settings to take multiple shots in a self timer mode, but when the pictures is taken, it takes only one shot. What am I doing wrong here?

Hi Shyam! First of all, I found your question little bit incomplete. You didn't mention what are the settings you have adjusted on the camera and under what lighting condition you are taking pictures. Sometimes, even if your camera settings are right, because of the available lights or not enough time to recycle the flash power or many other variables, you may not get the result you want. If you are shooting in a bright daylight, all you have to do is make sure that the camera is set to continuous (burst) shooting mode and the focus is being tracked and locked if the subject is moving. If you are shooting in a dark night and using an external flash unit, you might have to check couple of other settings as well, which I will describe bit later in this blog. First, lets review the setup steps that need to be done on the camera to take multiple shots in a self-timer mode.

Camera Settings for a Self-Timer Mode

In this blog, I am taking the reference of Nikon D90, but I believe these camera settings are same for almost every other Nikon DSLR camera. It is possible that you might find the buttons and the menu options in different places, but once you get the idea, it won’t be hard to adjust the settings no matter which camera brand and model you use.

Now, lets get into the setup menu.

1. Press the Menu button on the back of the camera and go to CSM (Custom Setting Menu).

2. Use the multi-selector button and go to c Timers/AE lock menu.

3. Go to the option c3 and select Self-timer, and you will see two options inside.

Nikon D90 Self-Timer Mode Menu

Nikon D90 Self-Timer Mode Menu

4. First option, Self-timer delay, allows you to set the time after how many seconds camera should start taking the pictures, and the available values are 2s, 5s, 10s, 20s.

4. And the next option is Number of shots you want to take in a self-timer mode. You can choose between 1 and 9 shots.

Nikon D90 Self-Timer Mode

Nikon D90 Self-Timer Mode

5. Optionally, you can also select CL (Continuous Low) mode shooting speed (1fps, 2fps, 3fps and 4fps) into CSM->Shooting/display->d6 (CL mode shooting speed).

D90 Burst Mode.png

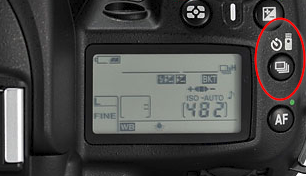
6. Finally, you have to change the shooting mode into self-timer mode (with burst shooting). You can do so my pressing the button on the top (shown in the picture) and rotating the main command dial while the button is still being pressed. When you see the burst mode with the clock (self-timer) icon displayed on the LCD screen, you can let go the button and you are all set.

If you have already done all of these setup on the camera and still not getting multiple shots in a self-timer mode, it is time to check your camera's Autofocus Mode. When you are shooting in a burst mode, you probably want to use AF-C or AF-A autofocus mode. And if you are shooting in a dark night with an external flash on, you may not get multiple shots because of the flash recycle time. Once you take a shot, flash may take a few seconds to recycle itself and get ready for the next shot. Also, if you are shooting with a higher frame rate, 4fps for example, its hard to achieve that shooting speed with an external flash unit attached on the camera.

I hope I was able to answer your question, and if you have a follow up question or more questions, please write back to me. Happy shooting!

Is Post Processing Necessary In Digital Photography?

This post is a part of our Q&A section. If you want to submit your question, please use the form in the Contact page.

QA.jpg

Afrina (Kuala Lumpur, Malaysia) asked : I am not a pro photographer but I enjoy photography. When I visit the flickr and other photographers' website or blog, they have a collection of amazing photographs. Some of the photographers also revel what editing tool they used and what was done on the picture during post-processing. Do you think it is necessary to use any software to make your photograph look good?

I have seen this confusion on many photographers from different level of expertise. I think this wouldn’t be that much of interesting topic when you are just starting photography but as you progress more on your composition skill and master your camera settings, the next stop would be the editing skill. I also went through the same situation a while ago and started looking my option for post-processing. When it comes to the editing, different photographers have different views about the process and the tools they would like to use. Even after reading many blogs and online tips, the answer was not so clear to me whether the editing skill is a must to have to enhance your photography or it is just an optional choice. Some of my friends jokingly say that, if you are using Photoshop to enhance your photographs then it's not a photography, it is a Photoshopgraphy. I find it funny but meaningful statement at the same time. When I see other photographers’ work, I forget all the critics and feel like editing is a must have skill set and is one of the important part of digital photography. After doing much research, I wrote a blog about post processing where I discussed more about the post-processing and listed down some of the best known post-processing software in the market.

To be honest, it is not always necessary to use a software and process the pictures but sometimes you find it necessary just to tweak some settings, adjust colors and lights or even crop the sides. Some people think cropping is not really a post processing but I would say, if you use any software to manipulate the photographs by any means, it is a post-processing because you processed the photographs after taking it out from the camera.

Let me present you an example of a photograph, before and after processing it, and you shall decide if post-processing is really necessary or not. And also, as always, I welcome your comments as well.

Before post processing

Before post processing

I took this photograph of the Lincoln Memorial Reflecting Pool last year. When I came home and downloaded the picture from the camera, I felt good about it's composition (symmetry) but felt like I was missing something on the picture. I was not really happy with the color contrast and thought of playing with the color tones and the contrast and see how will it become. I started editing the picture using Capture NX2, one of my favorite software to process RAW images. During the processing of the image, I increased the color contrast and adjusted the brightness of the picture which transformed the picture into the next level. Just a couple of small tweaks boosted the mood of the image and the result was very impressive. The picture looked more vibrant and lively after the post-processing.

After post processing

After post processing

The result is in front of you and I let you decide whether the post processing is really necessary in digital photography or not. But looking at the transformation this image got, I think you would agree that post-processing is an essential tool and may greatly help you to enhance the picture if done correctly. You just have to be careful about not doing it too much, otherwise it may not look natural.