White Balance

How To Set Custom White Balance

White balance is the tool to help get the colors in your images as accurate as possible. White balance setting is based on the color temperature and those color temperatures are measured in a Kelvin scale. Higher the temperature, more blue light exists and lower the temperature, more red light exists. You can take an example of fire; lower temperature fire produces red flame whereas higher temperature fire produces blue flame. As a photographer it is important to know that any light below 4000k starts to appear as a red light and any light above 7000k starts appearing bluish. In photography, the warmer light means red or yellow and the cooler light means blue light. You have to judge the environment and the lighting condition of the shooting spot and adjust the white balance accordingly to get the nice and pleasant color effects to the photographs.

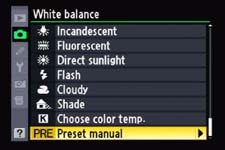
White Balance Menu on Nikon D90

White Balance Menu on Nikon D90

Nikon DSLRs come with the pretty standard predefined White Balance settings like Auto, Incandescent, Fluorescent, Direct Sunlight, Flash, Cloudy, Shade, Color temp and preset manual. Auto White Balance (AWB) works pretty well most of the time, but sometimes, you need to change the WB settings to get more accurate color representation on the picture. White balance can also be used to do an experiment with the color effects on the photograph and change the mood of the picture. Its an easy process to change the white balance option to one of the predefined settings. You just have to navigate through the white balance option from the menu button on the back of the camera (button location depends on your camera model) and select whatever value you want to set. If you are shooting under tungsten light bulb, you may want to change the white balance to Incandescent and if you are shooting outside, you may want to choose the direct sunlight and so on.

white-Balance-preset-manual-D90.jpg

If you want to set the custom White Balance rather than what is already provided with your camera, you have an option, called Preset Manual, in Nikon DSLR cameras. If you scroll all the way down to the white balance setting, you will see the last option as a preset manual denoted by 'PRE'. If you have not setup custom white balance using the preset manual before, you will see bunch of blank memory slots denoted by d-0, d-1, and d-2 and so on. These are the camera's memory slot to store the data from which it reads the white balance data if you choose to select the preset manual White Balance instead of other predefined values which we discussed earlier. Now, let’s discuss how to set the custom white balance.

How to set the Custom White balance using Preset Manual?

1. Set your camera into P, S, A or M mode.

2. Press and hold the WB (White Balance) button and rotate the rear command dial to select 'PRE' in the control panel and then release the WB button. When the white balance is in 'PRE' mode, you can use the front command dial to change the memory slot from d-0 to d-1, d-2 and others if available.

3. Press and hold the WB button for a few seconds again and you will see 'PRE' starts blinking on the top LCD screen.

4. While 'PRE' is blinking, take a shot of white or grey index card (Note: 'PRE' blinks about 10 seconds and you have to take the picture while it is blinking).

5. If the camera was successful to get the white balance data from the picture, it will display 'Good' on the LCD screen, and if not, it will display 'no Gd' and you have to try again with the proper exposure.

6. After you complete the process and set your custom white balance, your camera will take the reference of that image while applying the white balance to the future shots unless you have set the white balance to some other settings than PRE.

Introduction To Different Exposure Modes - Which Exposure Mode Should You Use?

Today's most of the consumer level DSLRs have dedicated scene modes like close-up, portrait, sports etc which sets exposure automatically when you dial into the mode. Besides these pre-programmed modes, it also comes with few other exposure modes (A, S, P and M) to allow you control over camera’s default settings. When you dial into those pre-configured mode, portrait mode for example, you really do not have a control over exposure. If you want to manually set the exposure, you have to use one of the four modes (Aperture Priority, Shutter Priority, Program Mode and Manual Exposure) available in your camera.

Image Source : Wikipedia

Image Source : Wikipedia

Out of these four modes, three of them are semi-automated modes and one is fully manual mode. When you want to change from one mode into another, you would have to rotate the Mode Dial and select the mode you want to change into. These settings are not specific to any particular camera model but different companies may use different alphabets to denote these modes. For example, Nikon’s shutter priority mode is denoted by letter S whereas Canon’s is T but the idea behind it’s functionality is the same. But in this blog, I will be taking Nikon DSLR as a reference camera when I explain these different modes. Now, let’s get into our first exposure mode which is an Aperture Priority (A) exposure mode.

1. Aperture Priority

In an Aperture Priority (A) mode, you set the lens’ aperture value or give priority to the aperture value and your camera sets the shutter speed to control the overall exposure of the image. This mode is probably best when you want to control the opening or the closing of your lens to gain shallow or deep depth of field. You would have to use the smaller F-stop (f/stop) value to get the shallower depth of field (famous for portrait or close up shots) and you might want to use the larger f/stop value to get everything in focus (widely used in landscape photography).

This mode is best if you want to lock the aperture at fixed value and want your camera to set the shutter speed according to the aperture value you set. If your current aperture value and the shutter speed doesn't match to give you optimal exposure for the subject, you will get Lo or HI indicator in the camera viewfinder telling you that subject is too dark or too bright resulting into underexposed or overexposed photograph. If you get the indicator on, you might want to consider adjusting your settings.

2. Shutter Priority

Our second exposure mode is the Shutter Priority (S) mode which is just an opposite of the Aperture Priority mode. In this mode, you set the shutter speed and your camera will adjust the aperture value for the corresponding shutter speed to give you the balanced exposure. You might want to use this mode when you want to shoot fast moving subjects to freeze the motion (shooting sports events for example). This mode is also famous for landscape photography specially if your frame contains moving subjects like water falls or vehicles where you can control the speed of shutter to produce long exposure effects.

3. Program Mode

Third exposure mode is the Program Mode (P) which is almost like an Auto mode but it will let you override some of the settings on the camera. Nikon uses sophisticated algorithm to determine the best exposure by using the combination of aperture and shutter speed. The algorithm takes the present lighting conditions and other variables into account and program the camera setting to the best of it’s ability. When you frame your photograph and the correct exposure can't be achieved using pre-set value, Lo or Hi indicator in the camera viewfinder warns you about the underexposed or overexposed image. If you get the warning, you can adjust ISO setting to change the light sensitivity and see if that makes any difference.

Unlike Auto mode, Program mode allows you to change the camera parameters such as Exposure Compensation, Metering, ISO, White Balance etc. If you want to change the shutter speed and the aperture value, use the main command dial (also called rear command dial) and it will give you the different combinations of aperture value and shutter speed with the same exposure. When you do that, the letter P (for the Program Mode) changes into (P*) into LCD screen which Nikon calls the "Flexible Program". If you want to go back to the default settings of P mode, you just have to rotate the command dial to the left or the right until P* changes into P.

4. Manual Exposure

Our fourth and final exposure type is Manual Exposure (M) mode. If you want the complete control of your camera, Manual Exposure mode is what you need to dial into. Most of the experience photographers and the professionals use this mode very often because they know how their camera metering system is going to react under certain shooting environment. In the Manual Exposure mode, you can set the shutter speed and the aperture value in whichever combination you like. When you are in Manual mode, rotate the main command dial to change the shutter speed and the sub-command dial (also called front command dial) to change the aperture value. In this mode, you can set everything manually including ISO, White Balance, File Type etc.

Personally, my favorite for the landscape or the cityscape photography is an Aperture Priority (A) mode where I can set the lens aperture to certain value and let the camera decide the shutter speed. If the lighting situation is tricky, I use the Manual mode and control both the Aperture value and the Shutter speed individually.

Understanding White Balance In Digital Photography

White Balance (WB) is the technique of managing colors in your picture. Unwanted colors which appears in the photograph are unpleasant and the process of removing or editing such insignificant colors is called the White Balance. White Balance is used to manage the color temperature, contrast, warmness of colors etc to get the real color tones. Digital cameras sometime get deceived with the light source and produces unpleasant photograph by mixing different colors in your photograph. Many photographers do not care about this option and they edit the colors during post-processing. But, in my view, its always worth to know about any technique that your camera has to offer so that you can apply it on the fly whenever you need it and probably save some editing time as well.

The basic principle and the simple reason we adjust the white balance is to get the colors of the photograph as accurate as possible. Most of the time, Auto White Balance works perfectly. But in some cases, applying Auto White Balance may produce extra orange, green or blue colors in your photograph. When we see subject with a naked eye, we see it pretty normal but camera's sensors apply different color settings to the photograph based upon different light sources. For example fluorescent light affects photographs with blue color whereas tungsten light source (Incandescent/Bulb) produces yellow color in your photographs. We can correct this problem with the help of White Balancing technique.

Bulb-Before.jpg

Photograph affected by the Bulb light source

Bulb-After.jpg

Photograph after adjusting the White Balance

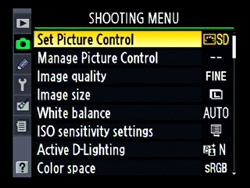
Today's advanced DSLR cameras have many more pre-defined White Balance settings. Nikon D90 also comes with many White Balance options such as Auto WB, Incandescent, Fluorescent, Direct sunlight, Flash, cloudy, Shade, Choose color temp or Preset Manual White Balance. You can choose different Balance techniques depending upon the light condition you are shooting at.

Personally, I shoot RAW images if I doubt the lighting condition and then edit the White Balance later during post-processing.

Advantage of Shooting RAW Images

If you have a doubt on the given lighting condition, you may choose to shoot in a RAW Format and then edit those RAW images during post-processing. When you shoot picture in a RAW format, you will get the exact image taken by the camera's sensor without applying any adjustments like White Balance, Active D-lighting etc. In fact, camera will bypass all these settings and gives you RAW image. This is the beauty of shooting in a RAW format; let the camera take picture as it likes and edit them later on the computer.

And just in case if you want to shoot in a JPEG Format to save some space on your camera memory or for any other reason, Auto White Balance does a pretty good job most of the time. You can always take a shot, preview it on the LCD screen, set the white balance to one of the available presets and take another shot again.